Ultrasonic Welding Stack Assembly
|

 |
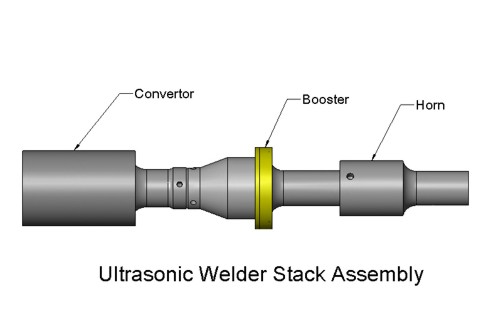
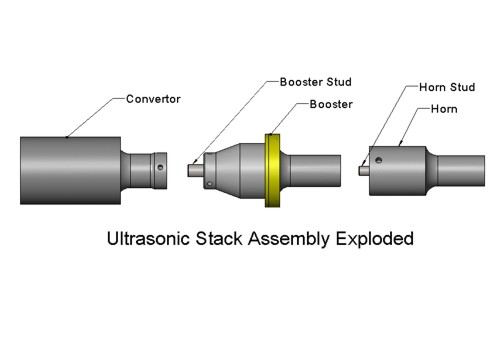
The Ultrasonic Stack Assembly consist of Convertor, Booster, Horn and
two studs. To tune properly the stack needs to appear to be one solid
pike of material. Any one part of the stack that is loose or has
a crack in it will make the stack not tune properly, usually making
the welding machine overload.
If your welding machine is overloading while attempting to test the
Ultrasonic's do the following:
| 1. |
Remove the stack from the welder. |
| 2. |
Using a Bench Vice or Spanner Wrench remove
the horn. |
| 3. |
Using a Allen Wrench and Bench Vice or Spanner Wrench
remove the Horn Stud. |
| 4. |
Examine the Horn Stud for stress cracks. |
| 5. |
Using a Bench Vice or Spanner Wrenches remove the Booster
from the Convertor. |
| 3. |
Using a Allen Wrench and Bench Vice or Spanner Wrench
remove the Booster Stud. |
| 4. |
Examine the Booster Stud for stress cracks. |
| 6. |
Examine the Horn for stress cracks. |
| 7. |
Examine the Booster for stress cracks. |
| 8. |
Examine the Convertor for stress cracks. Shake the
Convertor. If it rattles the crystals have broken and it must
be rebuilt or replaced. |
If everything appears to be OK start to reassemble the Stack:
| 1. |
Clean any debris from the Convertor output. |
| 2. |
Clean and debris from the Booster Input and Stud Hole. |
| 3. |
Insert the Booster Stud into the Booster. Using a Allen
Wench and a Bench Vice or Spanner Wench tighten the Stud into
the Booster. |
| 4. |
Screw the Convertor onto the
Booster. Using tools tighten the Booster to Convertor. |
| 5. |
Clean any debris from the
Booster Output. |
| 6. |
Clean any debris from the
Horn Input and Stud Hole. |
| 7. |
Screw the Horn Stud into the
Horn. Using tools tighten the Stud to Horn. |
| 8. |
Screw the Horn onto the
Booster. Using tools tighten the Horn onto the Booster. |
Put the Stack back into the welding machine. Use the machine
Test Button to see of the stack will tune. |
|
Stack Assembly Tightening Information
Studs in horns and boosters:
| 12-18 in.-lb |
1-1.5 ft.- lb |
1/2 X 20 studs |
| 12-18 in.-lb |
1-1.5 ft.- lb |
3/8 X 24 studs |
| 12-18 in.-lb |
1-1.5 ft.- lb |
8 mm studs |
Transducer/booster/horn assembly:
| 540 in.- lb |
45 ft.- lb |
15 kHz Stack |
| 420 in.- lb |
35 ft.- lb |
20kHz Stack |
| 216 in.- lb |
18 ft.- lb |
40 kHz Stack |
|
|
|